- England
-
- South West
- East of England
- South East
- East Midlands
- Yorkshire and the Humber
- North West
- West Midlands
- North East
- Greater London
- Scotland
- Wales
- Northern Ireland
- Crown Dependencies
FAQ & Organisers Guide
The Frequently Asked Questions section has been created to answer the more commonly asked questions by our Customers and Event Organisers. If your question is not listed below, please contact us and we will answer your enquiry and also include your question in this FAQ section to help other users of the website.
The Organisers User Guide has been created to help Organisers navigate around the Organisers section of the website. BookitZone has been developed to give Organisers a great deal of control over their own event and this guide will explain how you can do this.
Frequently Asked Questions:
General
Q. Is BookitZone on twitter / facebook?
Q. Where can I find information about cookie use?
Q. Where can I view your Terms and Conditions?
Q. Where can I view your Privacy Policy?
Q. Where can I find information about your BookitZones' website security?
Q. Tell me more about BookitZone and its history.
Q. Where can I find testimonials from previous customers and organisers?
Customer Specific FAQ
Q. I have registered with the website, but haven't received an email and can't sign in.
Q. I'm trying to register but your system won't accept my postcode.
Q. I have never used BookitZone, yet the website says I am already registered. Why?
Q. I only want to sign up for one event - why do I have to register with BookitZone to do this?
Q. How do I know when online entries will close for an event?
Organiser Specific FAQ
Q. What is the difference between 'Pay-to-enter' and 'Free-to-enter' events?
Q. I have created an event on BookitZone, but have heard nothing further.
Q. How do I download entries once they have started to come in?
Q. Can I insert a link from BookitZone back to my own website?
Editing Events FAQ
Q. How can I change the name of my event?
Q. How can I change the category of my event?
Q. Can I amend the number of places available for my event?
Q. The pointer on the map is in the wrong location, can this be changed?
Q. I need to add a colleague so that they too can edit the event on BookitZone. Is this possible?
Q. How do I add a colleague so that they receive a copy of the entrant email notifications?
Q. Can I add a colleague so that they can only view the entry file?
Q. Can I upload an electronic copy of documents related to my event?
Q. Can I upload images relevant to my event?
Q. How do I edit the description of my event that is displayed when people visit my event page?
Q. Does BookitZone have a waiting list facility if my event reaches its entry limit?
Q. How do I add an Organiser disclaimer that people entering my event will need to accept?
Q. Can I automatically send a message to successful paid entrants?
Q. How can I check when online entries are set to close?
Q. How do I amend the date/time that online entries will automatically close?
Q. Where do I set the maximum number of tickets/places that are available for my event?
Q. How do I set/change the minimum ages applicable to my event?
Q. Can I set a maximum limit of the number of tickets one person can buy for my event?
Q. What is the 'Event Confirmation/Ticket Delivery Method section for?
Q. How do I set additional bespoke questions on the entry form?
Q. I would like to add an 'Early Bird' type discount - how do I do this?
Q. Can I allow a customer a free entry using the PROMOCODE section?
Q. What do the items listed in the 'Actions' column do?
Q. I have had to cancel the event - what do I need to do and what are my responsibilities?
Q. How do I find the QR code that is unique to my event?
Q. My event is full, how do I close it?
Q. Can the website show the date that online entry will close?
![]()
A Guide
for
Event Organisers
(v.1.0.140624)
Organisers Guide
The following guide has been created to help Organisers to navigate around the Organisers section of the website. BookitZone has been developed to give Organisers a great deal of control over their own event. The following guide will help you to make changes to your event and understand some of the features of the website.
Firstly you will need to sign on to the website using your username (your email address) and your password. If you forget your password you can use the password reset facility.


Once signed in, the red ‘Signin/Register’ tab will change to display your name.


Click on this red tab at any time to return to your ‘Dashboard’.
Dashboard Page
Your ‘Dashboard’ is the hub for all your needs. Use the dashb to update your user profile, view/edit your organised event(s), create invoices for payment of entry fees, view details of any event purchases, view payments received for completed events and view details of any waiting lists you are on for sold out events.

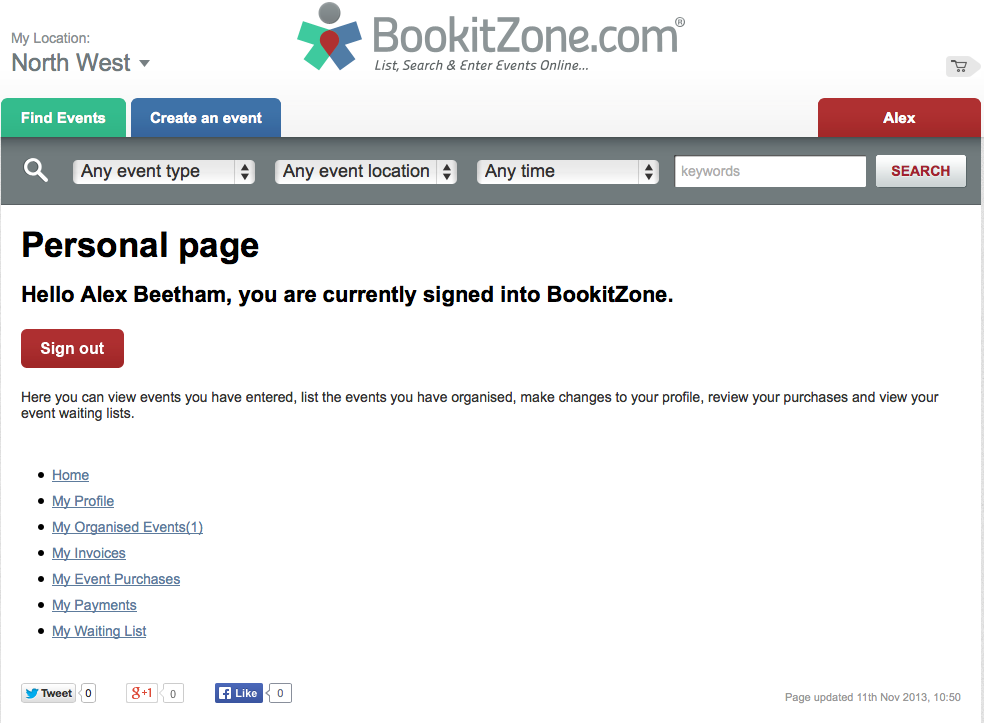
This user guide is about editing your event, so now click on the ‘My Organised Events’ link.

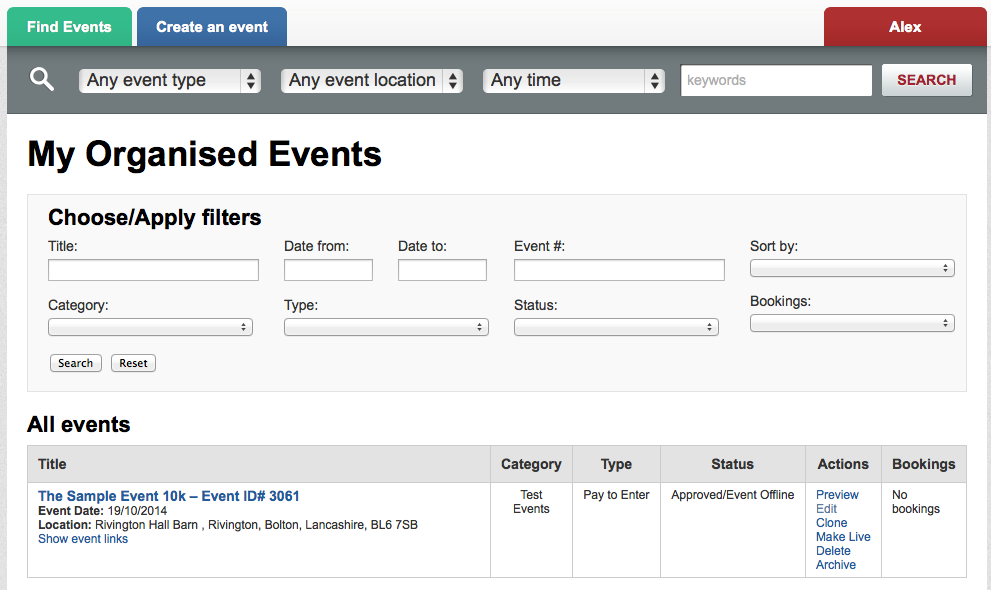
All your events will be listed on the lower part of this page under the ‘All events’ section. In this example the Organiser has only one event listed – ‘The Sample Event 10k’
If you have many events listed on BookitZone, you can easily apply filters or search for a particular event using the ‘Choose/Apply filters’ section above.
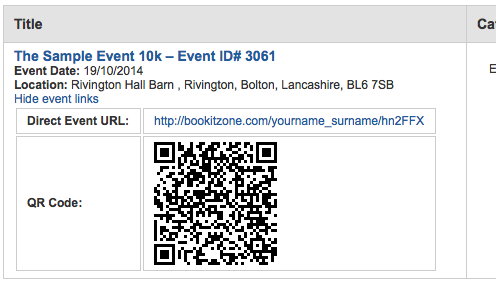
Viewing your unique URL for your event
Clicking on ‘Show event links’ displays the unique QR code and Direct URL link that can be used on promotional posters, flyers, websites etc.


These links are unique to this event only – other events by the same Organiser will have different URL’s and QR Codes.

This guide will now show you how to edit your event. Click on ‘Edit’ under the ‘Actions’ column.


Editing your event
As organiser of the event you have full control of your event meaning you can make changes to the event at any time and from anywhere with an internet connection.
This guide will explain how and where to make changes.
Having clicked on ‘Edit’ you will now be looking at the detail that makes up your event. Making changes to this will (once you have clicked on ‘save’) immediately change the event as seen by your customers visiting BookitZone.com.
There are five tabs that run from left to right. We will cover each of these tabs in order. If not already selected, click on the ‘General Details’ tab.
GENERAL DETAILS TAB:


Items contained on the ‘General Details’ webpage:
- Event Name
- Event Category
- Event Type
- Private Events
- Organiser Details
- Event Location
- Contact Details for Enquiries
- Email Notifications
- Event Administrators
Event Name:
If you wish to edit the name of your event, make your change and click ‘save’ at the top of the page.
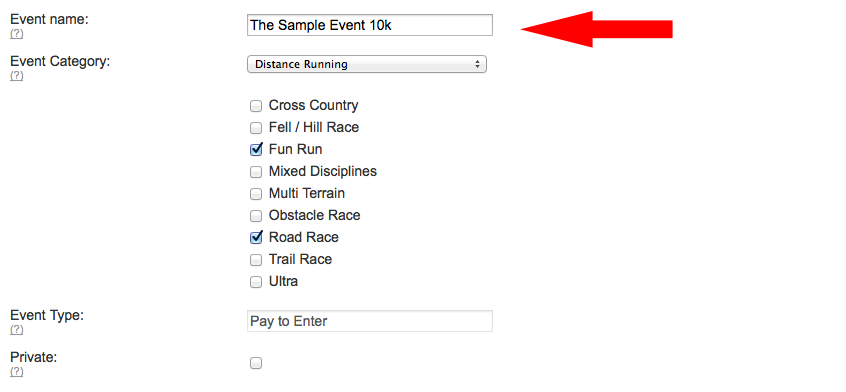

Event Category:
You can choose the best event category for your event here. If your event has more than one race type at the same event or falls under several categories, you can tick multiple choices.
If your desired event category is not currently listed, please contact us to let us know and we will create an appropriate category for you.

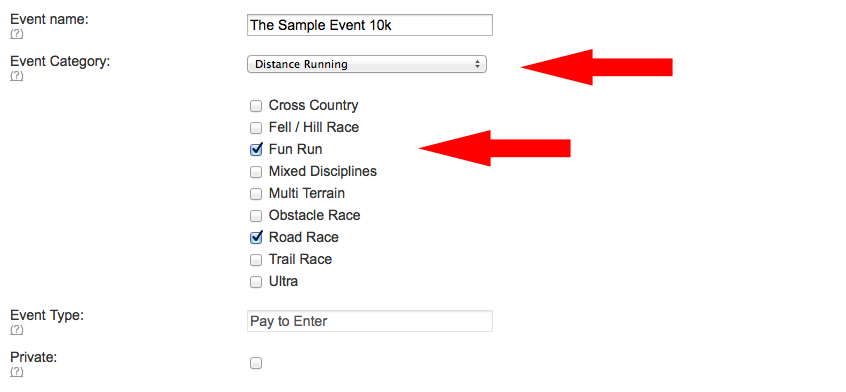
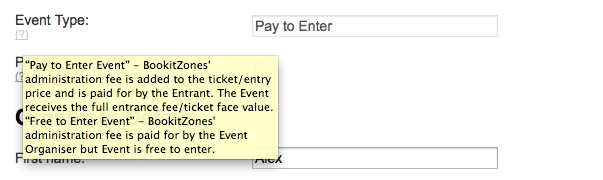
Event Type:
Most events will be ‘Pay to Enter’ events. Events such as running events, cycle races and fishing matches. For these events, your customer will ‘Pay to Enter’ the event.
‘Free to Enter’ events are those such as a business conference, where a company may wish event attendance to be managed by BookitZone, but there is no entrance fee charged to employees to attend the event.

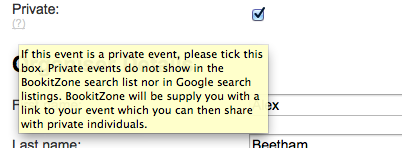
Private events:
If you do not wish your event to be published on the BookitZone website publicly, you can select this tick box to make your event ‘Private’

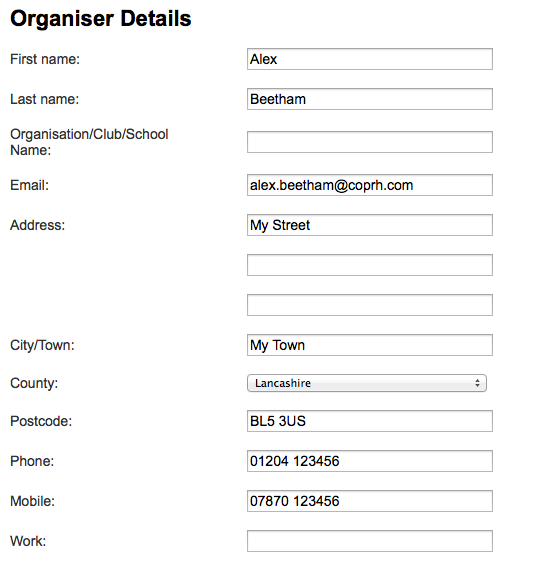
Organiser Details:
These are the details that BookitZone holds on record about you. These details are not publicly visible on the website and are used by BookitZone to contact you if needed. Please ensure these are correct.

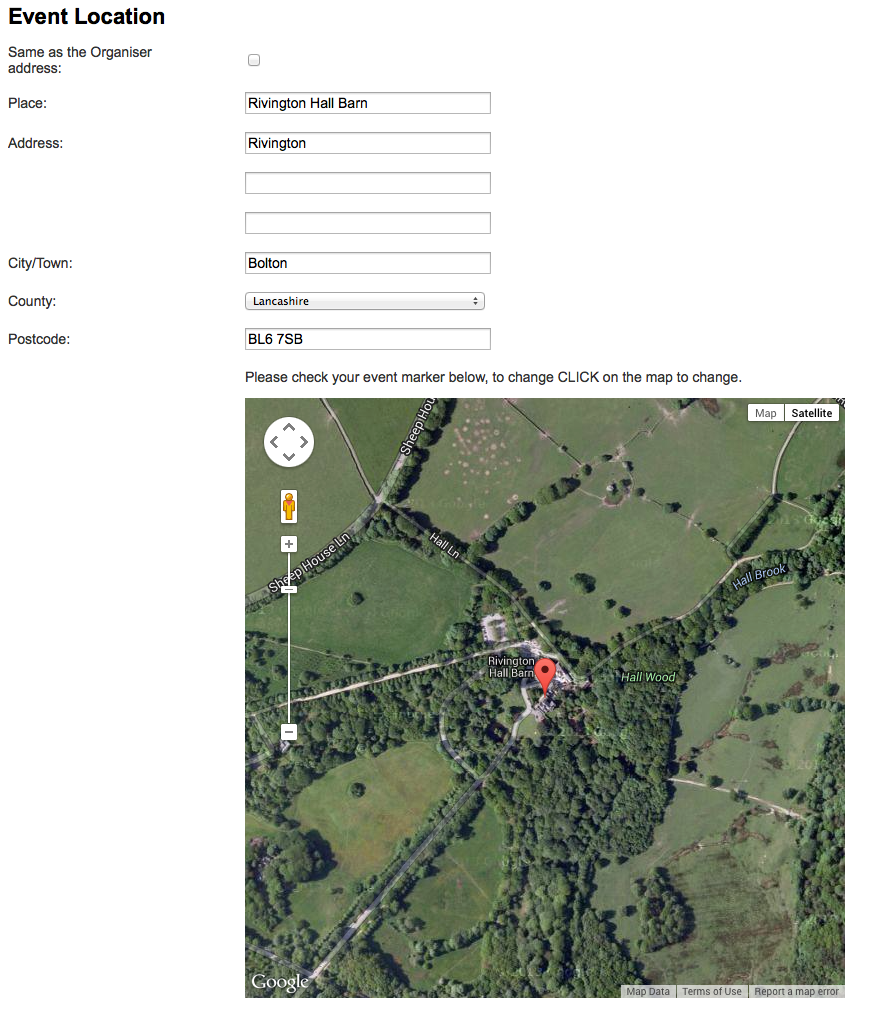
Event Location:
This is the location of the event and is intended to be where entrants to your event will head towards on the day of the event.
The pointer on the map can be relocated by a single left mouse click on the correct position on the map.
Please note that if you change the location of the event after you have already received entries/sold tickets for the event, it is your responsibility to contact all those that have already made a purchase to advise them of the change of venue. BookitZone is not responsible for these notifications or any subsequent issues arising from this change.

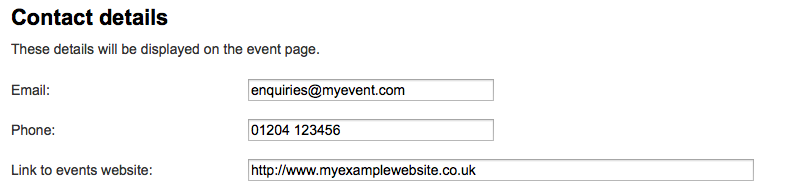
Contact details:
These details are publicly displayed so that any customer with an enquiry can contact you directly. An email address is mandatory, but doesn’t have to be your own personal email address, it can be a different email address to your own (for example your club contact email address.
You can also choose to add a phone number for enquiries and there is room for you to add details of the event website (for example).

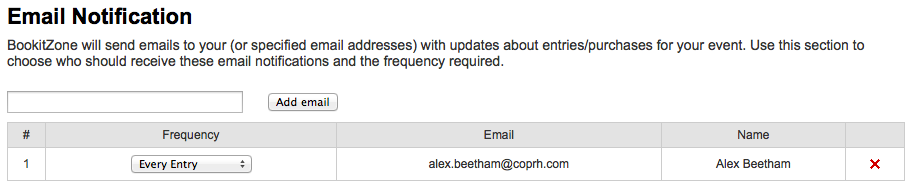
Email Notifications:
BookitZone has been designed so that you can receive an email whenever somebody purchases a ticket for (or makes an entry to) your event. These can be switched off if required.
You can also add other email addresses to receive these notifications too by adding the required email address(es) in this section. Please note that the email addresses must be registered as having a user account on BookitZone before attempting to add them in this section.

You should not rely on these emails as confirmation of your entries. Emails can be unreliable on occasion. As an organiser you can sign on to BookitZone and download the very latest complete list of all your paid entries to date in one convenient .csv file. A .csv file can be opened by most spreadsheet software such as MSExcel, Numbers, Google Sheets, Open Office etc. To download your entry file, see the link on the ‘My Organised Events’ section of your ‘Dashboard’.
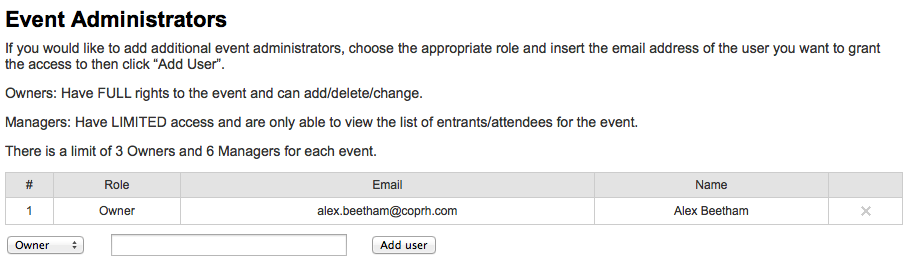
Event Administrators
As the Owner of this event, you are able to sign on, and view, edit and download the very latest entry file for your event.
On occasion you may wish to add permissions for a colleague to be able to do the same. There are two levels of permissions that can be granted:
An ‘Owner’ has FULL CONTROL over the event and can view the event, edit it and make ANY change to it, and also download the entry file. A ‘Manager’ can only download the very latest entry file.
Please note that the email addresses must be registered as having a user account on BookitZone before you attempt to assign permissions for them in this section.

*** IMPORTANT: WHENEVER YOU HAVE MADE ANY CHANGE TO YOUR EVENT, PLEASE REMEMBER TO CLICK ‘SAVE’ OTHERWISE YOUR CHANGES WILL BE LOST ***
DESIGN TAB:


Items contained on the ‘Design’ tab:
- Event Description
- Upload PDF
- Upload Images
- Event Disclaimer
- Message to Successful Applicants
- Waiting List Feature
Event Description:
You can use this section to write a description of your event that may be of interest to those deciding whether they wish to attend.
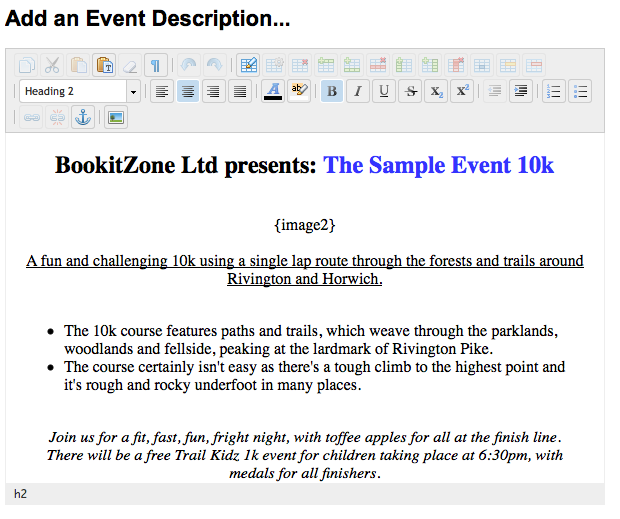

Write as much or as little as you like to best describe your event and grab the attention of potential customers.
For those with more advanced computer skills, you can try your hand at adding coloured text, photos, links, tables etc using the design toolbox provided.
Really go to town and make your event stand out from the crowd!
Upload PDF:
This feature allows you to upload a copy of your event brochure in PDF format. You can upload a paper entry form, or document containing detailed information about the event for example.
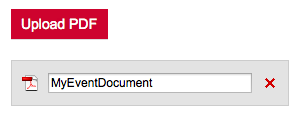

If you wish to replace the brochure, simply click on the red ‘X’ to delete the current document and then add the revised document by clicking the red ‘Upload PDF’ button.
Upload Images:
As the saying goes, ‘A pictures speaks a thousand words.’
The ‘Upload Image’ button allows you to upload any images / photos that you wish. For example, you might choose to add event sponsor logos, a course map, or pictures from last years event.

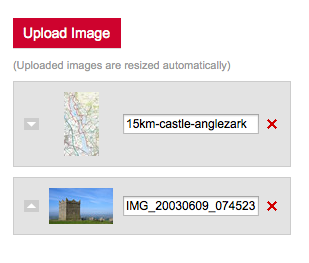
Upload images at their full size (BookitZone intelligently resizes images for you and generates thumbnails for them).
If you wish to remove an image, simply click on the red ‘X’ to delete the current image. You can amend the order in which the images appear using the small up and down arrows on the left hand side of the images.
Event disclaimer:
Specify here the terms and conditions of entry to your event.
All purchases for your event can only be made having agreed to the event terms and conditions listed here.
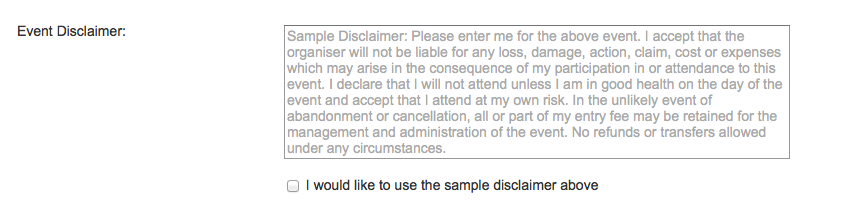

You can specify your own terms and conditions or tick the ‘I would like to use the sample disclaimer above’ to use the sample terms and conditions as your own.
Message to successful applicants:
Every time a customer makes an entry (or purchases a ticket) for your event, BookitZone sends out a confirmation email to them to confirm their booking..
As the event organiser, you can add a message to the confirmation email. Examples may include thanking them for entering the event, what to expect, how to get there, where to park etc.


Enter your message here.
Waiting list feature
If you expect places for your event to sell out, you can add a waiting list feature by ticking the ‘Yes, please operate a waiting list for my event’ box.
Once the event is full, BookitZone will automatically close off the event and display the event as full. If you choose the waiting list feature, interested potential applicants can add themselves to a waiting list.
If for example you have a number of drop outs, or decide to sell more places, those on the waiting list will automatically be sent an email to let them know that more places are now available on a first come first served basis.


*** IMPORTANT: WHENEVER YOU HAVE MADE ANY CHANGE TO YOUR EVENT, PLEASE REMEMBER TO CLICK ‘SAVE’ OTHERWISE YOUR CHANGES WILL BE LOST ***
EVENT OPTIONS TAB


Items contained on the ‘Event Options’ tab:
- Event Date and Time
- Event End Date/Time
- Closing Date for Entries/Tickets
- Date and Add Date Function
- Maximum Entries/Tickets
- Event Options
- Price
- Option Limits
- Offline Booking Count
- Online Booking Count
- Web Link
- Start Time
- Age Restrictions
- UKA/FRA/SAL Affiliated Club Details and Membership Details
- Add Event/Ticket Options
- Add a Date
- Limit Number of Entries/Tickets Per User
- Entry Confirmation/Ticket Delivery Method
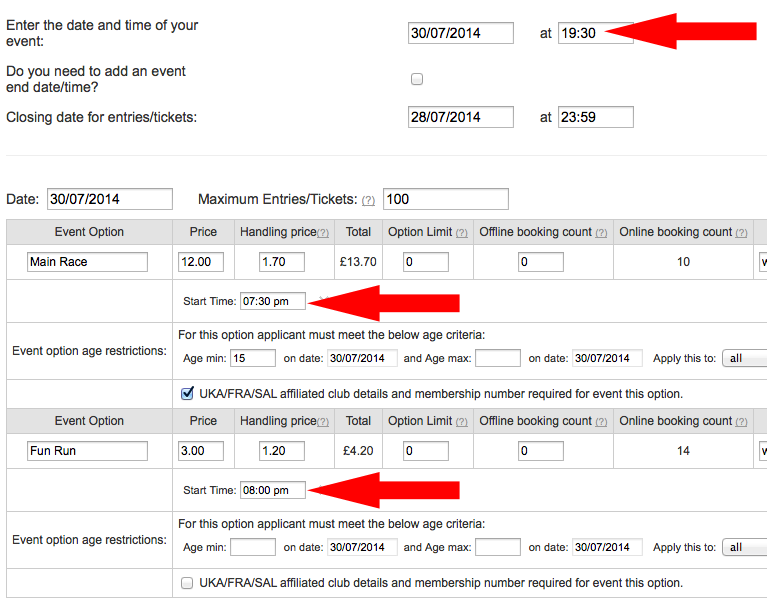
Event date and time
The date and time of your event are shown on this page.
Changing the date or time of your event can be done by amending the main date/time field AND ALL individual time fields FOR EACH EVENT OPTION as shown on the image below:


Changing the event date/time should only be done after careful consideration.
Please note that if you change the date and/or time of the event after you have already received entries/sold tickets for the event, it is your responsibility to contact all those that have already made a purchase to advise them of the change. BookitZone is not responsible for these notifications or any subsequent issues arising from this change.
Event End Date/Time
If your event is held over a number of days, you can add an event end date.
Tick the ‘Do you need to add an event end date/time?’ checkbox and add the end date and time for your event.

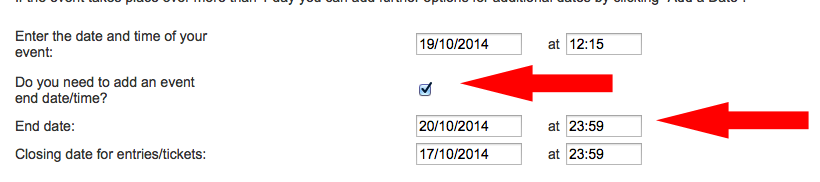
Closing date for entries/tickets
Online entries for your event will automatically close on the date and time listed in the ‘Closing date for entries/tickets’ field.
You can amend this date and time if you wish to close the event earlier (or later) than the date shown. The default is two days prior to the event,


Remember to click ‘Save’ to save your changes.
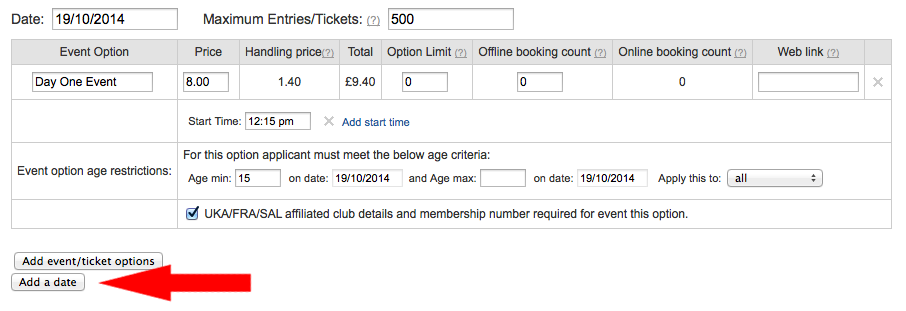
Date and Add Date Function
This field relates to the date on which the event options in the table below are due to take place.
In the example below, the event takes place over two days with male and female races taking place on different days.
Additional Dates can be added using the ‘Add a date’ button.

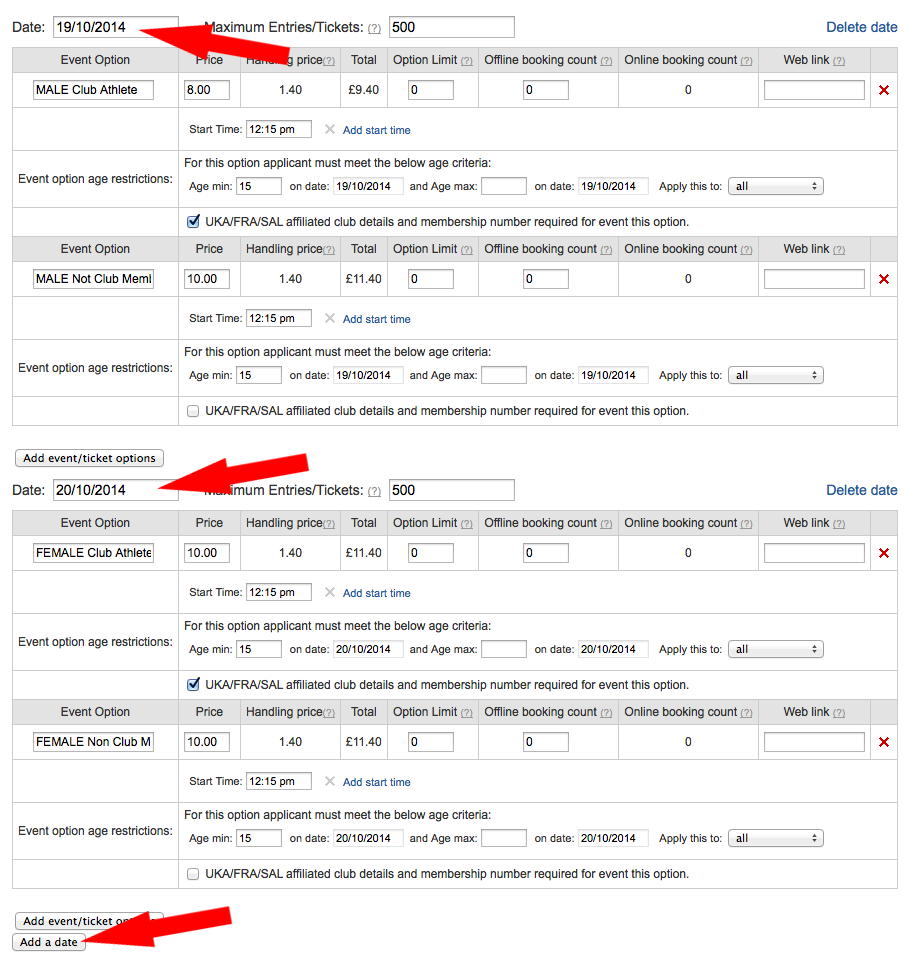
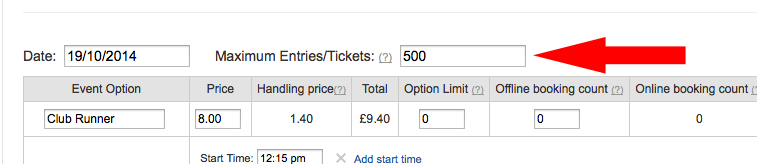
Maximum entries/tickets
This field is the maximum number of tickets/places that are available for customers to purchase for your event on this date.
Once this number of places/tickets for your event has been sold by BookitZone it will automatically close off online entries and mark the event as ‘full’.

Event Options
Event options can be added and removed, however it is not advisable to do so once your event is ‘live’ and accepting entries.
Examples of event options may include (for example):
Club Runners
Non-club runners
Fun Run
Gold tickets
Standard tickets
Adults
Juniors
In the example below, there are three event options available, Club runners, non-club runners and fun run entries.

Price
Enter the price for each event option. BookitZone will add a handling fee which is shown in the handling price column. The Total is the amount displayed and paid for by the customer/entrant.
The price can be changed after entries have been received, and BookitZone will charge future customers the revised amount.

Option limits
If the event has restricted numbers of places/tickets for event options you can set these in the ‘Option Limit’ column.
In the example below, BookitZone will sell a maximum of 30 Gold VIP tickets, a maximum of 150 Silver Seated Tickets and a maximum of 820 Standing tickets.
If event options sell out (for example all 30 Gold Tickets are sold) that event option will be marked as ‘full’ but online entry will remain open for the remaining event options.
BookitZone will never allow any combination of ticket sales to exceed the Venue maximum stated in the ‘Maximum Entries/Ticket’ field.
As purchases for your event are made, you are able to monitor sales and adjust limits as necessary to maximize sales.


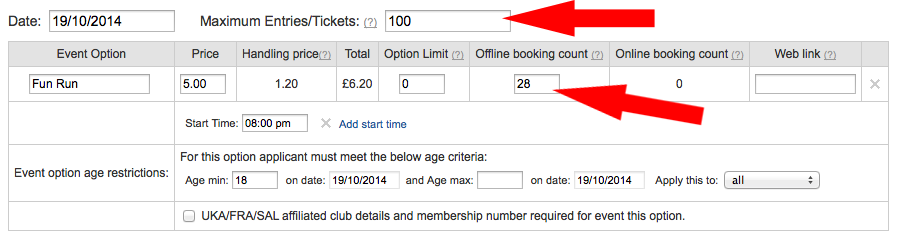
Offline booking count
If you are accepting methods via other methods, such as other online entry services or postal entries, BookitZone allows you to add these ‘Offline Entries’ to the BookitZone website in the ‘Offline booking count’ field. BookitZone will compensate for the places sold elsewhere and adjust the amount left available to sell via BookitZone.
In the example below, there are 100 places available for this event option, 28 have been sold elsewhere, so BookitZone will only sell 72 places before closing the online entries and marking the event as ‘full/sold out’

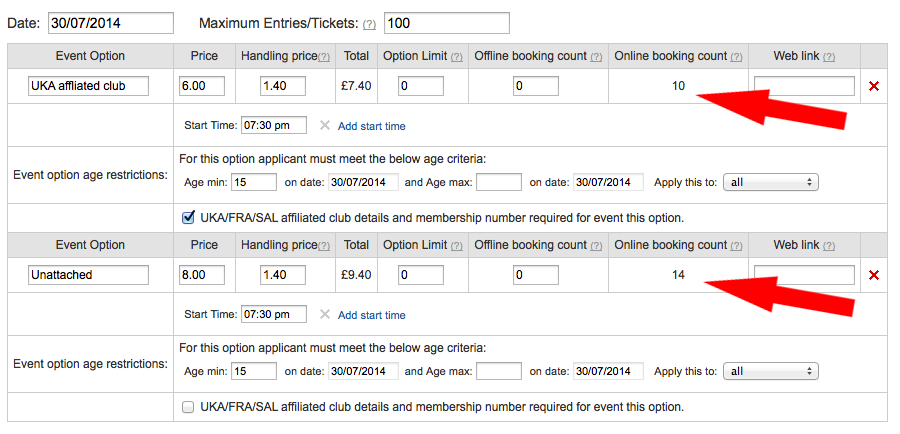
Online booking count
This counter is the number of places/tickets that have been sold by BookitZone for each event option.
In the example below, BookitZone has sold 10 Affiliated Club entries and 14 ‘Unattached’ entries.
Based on the 100 Maximum limit, BookitZone will sell an additional 76 entries before automatically closing and marking the event as ‘full’.

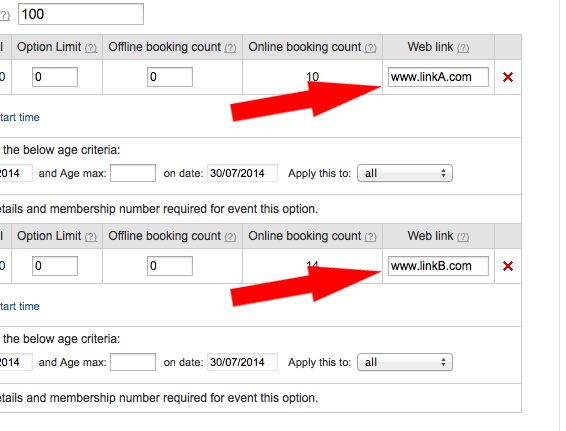
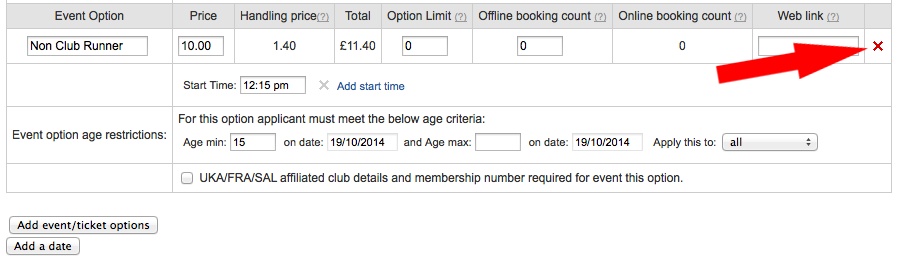
Web link
If you have specific web pages that relate to each event option, you can insert each unique URL in these fields.

Start time
Although the main event start time is shown at the top of this page, there may be ancillary events that have a different start time. You can specify the start time for each event option in the ‘Start Time’ field.
In the below example, the main race starts at 7.30 but the Fun Run starts at 8.00pm.

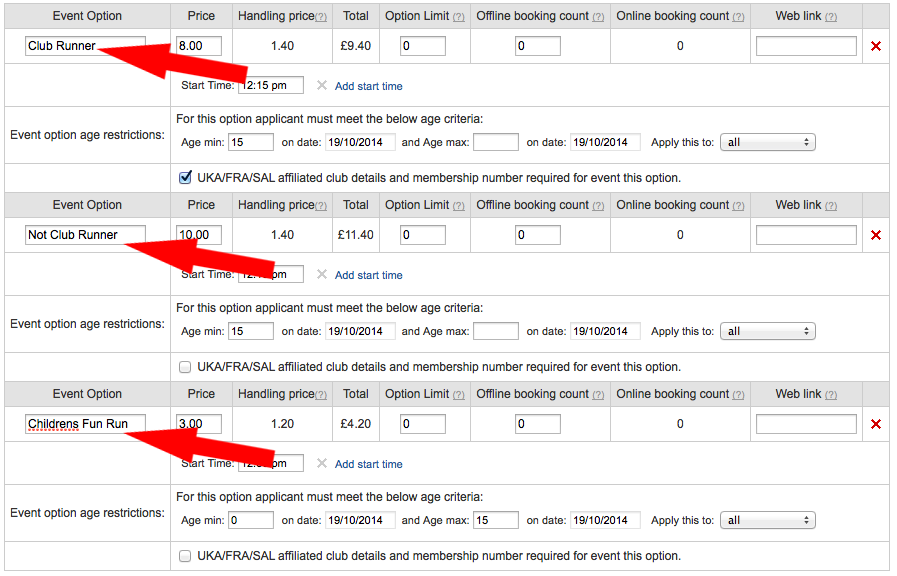
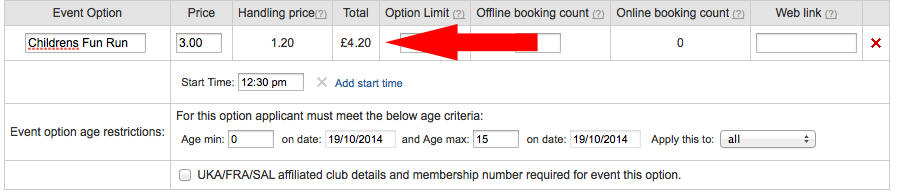
Age restrictions
For each event option you can set individual age restrictions. In the example below, for the main race an entrant must be aged 16+ on the day of the event. For the Childrens Fun Run, applicants must be a minimum age of 2 and a maximum age of 15 on the day of the event.
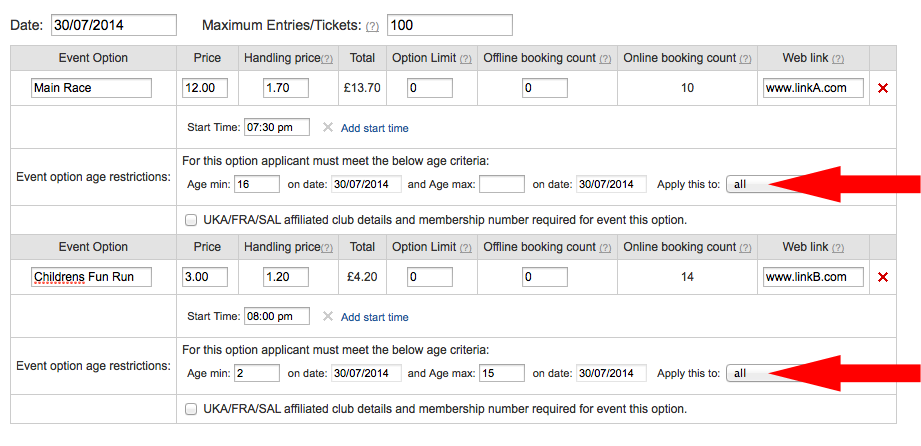

Should it be required, you can also apply the restriction to males/females only.
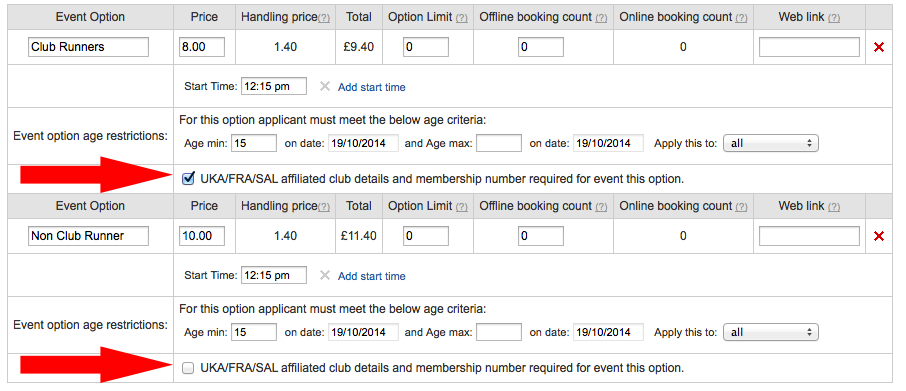
UKA/FRA/SAL affiliated club details and membership details
For distance running and other applicable events, BookitZone can add fields on the entry form which will ask entrants for running club details and a required membership number. To do this tick the ‘UKA/FRA/SAL affiliated club details and membership number required for this even option’ checkbox .
Please note that BookitZone does NOT ask for running club details by default. This needs to be specified either on this page, or by adding an additional question on the ‘Additions’ Tab – explained later.

Add event/ticket options
To add another event option, click the ‘Add event/ticket options’ button.
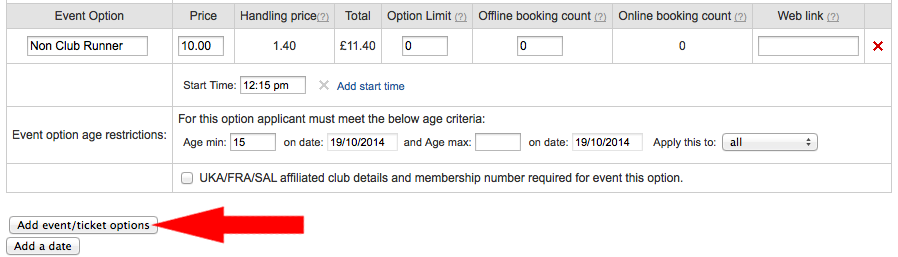

To remove an event option, click on the red ‘x’ next to the event option you wish to delete.

Add a date
If your event spans over a number of days, you can add additional days (and then the event options available on those days) by using the ‘Add a date’ button.

Limit number or entries/tickets per user
On occasion, you may wish to limit the number of tickets that can be purchased in one transaction.
If so, you can set the maximum number of tickets that can be sold in one transaction here.
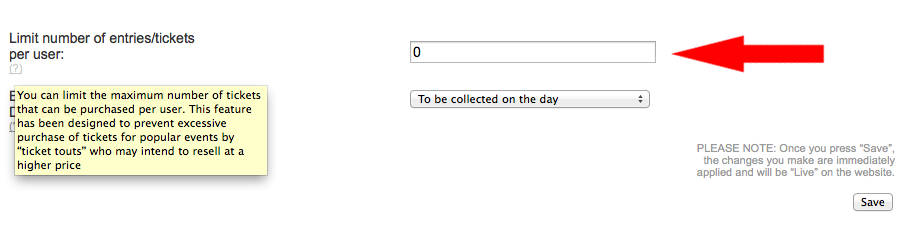

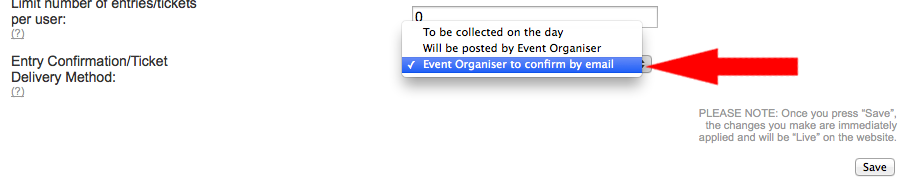
Entry confirmation/ticket delivery method
In this section, there are three options available.
Option 1:
‘To be collected on the day.’ - If online entrants are to collect their ticket from the box office at the venue, or are to be issued with a race number at race HQ or should simply give their name at the gate, choose this option.


Option 2:
If you are posting out tickets/race numbers to your customers prior to the event please select ‘Will be posted by organiser’. You will notice that an additional date box appears. Customers that purchase tickets/a place for your event before this date will be automatically advised to expect their race number/ticket in the post.
For those that enter your event after this date (but before the date that online entries are set to automatically close), they will be advised as per option 1 above.
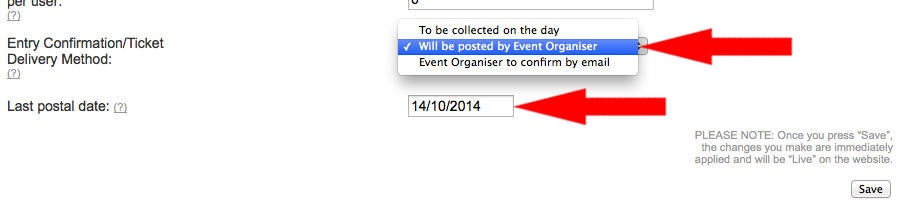

Option3
The final option is that you will confirm further instructions to each applicant individually by email.

*** IMPORTANT: WHENEVER YOU HAVE MADE ANY CHANGE TO YOUR EVENT, PLEASE REMEMBER TO CLICK ‘SAVE’ OTHERWISE YOUR CHANGES WILL BE LOST ***
ADDITIONS TAB


Items contained on the ‘Additions’ tab:
- Introduction
- Adding a Highlighted Title Field
- Creating Additional Questions
- Types of Preset Responses
Introduction
The ‘Additions’ Tab is a highly advanced feature of the website which enables you to design bespoke questions that can be asked of your customers on the entry form during the entry process.
By adding questions here, you can completely tailor the entry process and make it unique to your event. Any question you wish to ask, you can ask it here and with a choice of pre-set response fields and a choice of making the question compulsory or optional, you will always be able to capture the exact information you need from those attending your event.
Some examples of typical questions you may ask are listed below. But don’t forget, these are your questions and you can ask whatever you like. If you want to ask for a customers’ favourite colour – you could do!
Example questions:
Add a highlighted title field.
Are you vegetarian?
What is your Tshirt size?
Please provide your vehicle registration number to help with parking.
How did you hear about our event?
Are you happy for our sponsors to contact you?
Whats your estimated finishing time for a race of this length?
State your previous personal best.
In the sections that follow we will look at how you can create tailored questions and how they will look to the customer on the entry form.
Adding a highlighted title field
If you wish to draw attention to a particular aspect of your event, or highlight a particular message, you can do so by adding a ‘Title’ from the ‘Extra option:’ section.
Type the text you wish to appear in the ‘Text:’ field.
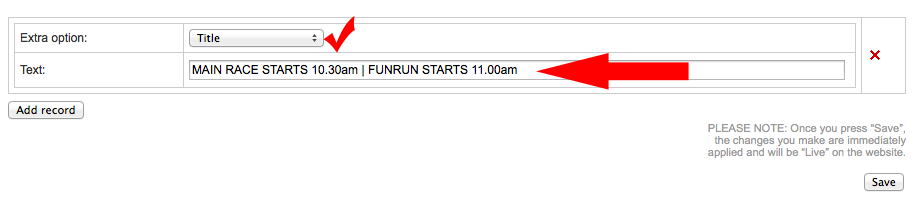

This is how the title field will appear on your finished entry form:
(awaiting image)
Creating additional questions
‘Extra Option’
You can choose whereabouts the question will appear on the online entry form however it is likely that you would want most questions to appear in the ‘Personal Details’ section.
In the sections below we show the same question and where it would appear on the entry form depending on whether you select the ‘Event Details’, ‘Personal Details’ or ‘Contact Details’ section.
Event Details Section:
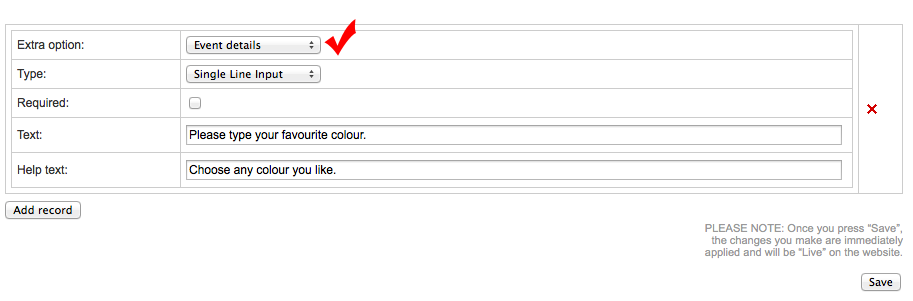

The question will appear here:


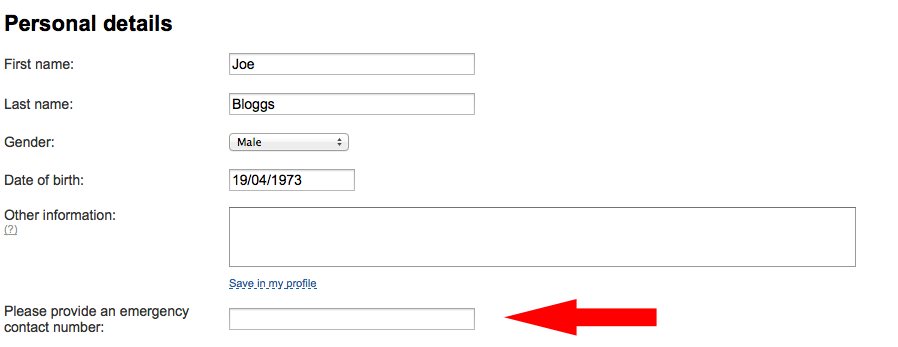
Personal Details Section
The same question shown in the personal details section:


Shows here:

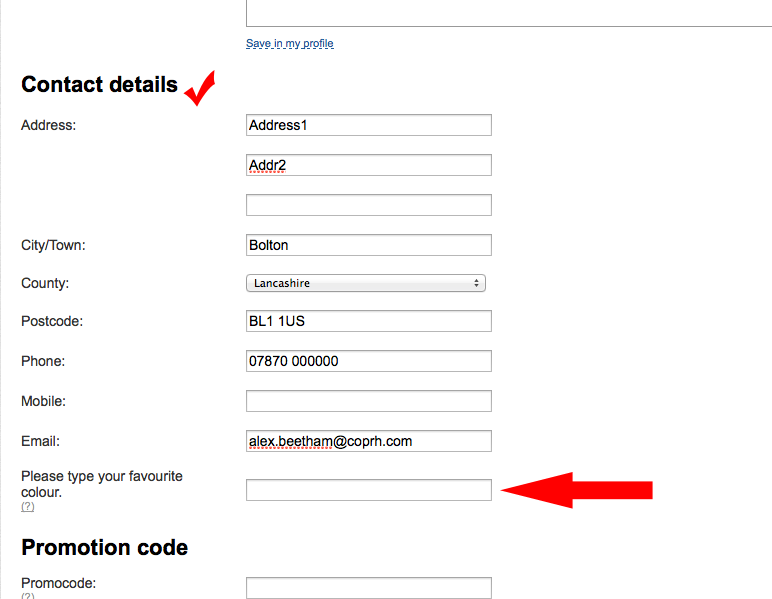
Contact Details Section:
The same question shown in the personal details section:


Shows here:

Types of pre-set responses
Once you have chosen the section in which you wish your question to appear, you can choose the layout for the expected response to your question by choosing one of the options from the ‘Type’ field.
The choices are:
- ‘Text’,
- ‘Checkbox’,
- ‘Radio Button’,
- ‘Time’
- ‘Single line Input’.
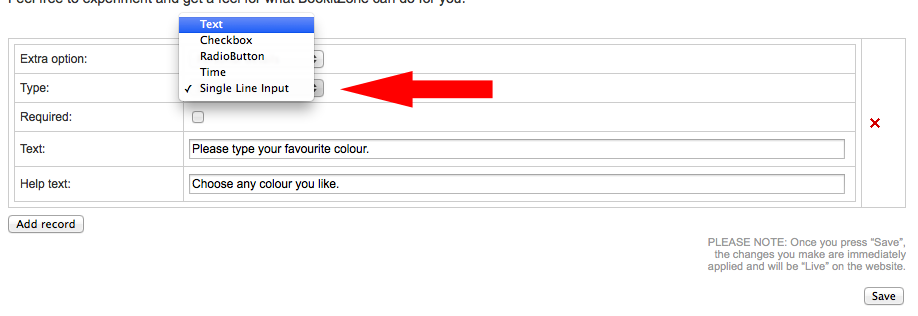

Each option is covered below.
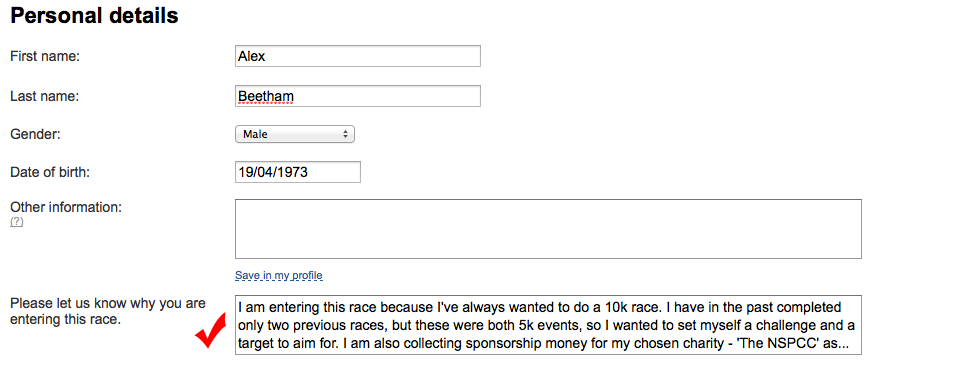
Types of pre-set responses - ‘Text’
If you set the ‘Type’ box to ‘Text’, the response field shown to the person entering your event will be multi character, multi line text box. Use this option if you expect that the customer response will be a large amount of text.
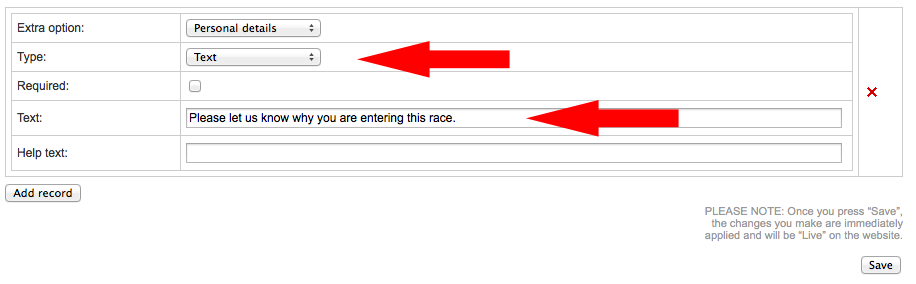

Here is the question and a sample response from a customer. You will notice that the ‘Text Box’ is three lines deep, but a typed response could be longer than this.
Types of pre-set responses - ‘Checkbox’
If you wish the customer to be able to choose a number of options from pre-set answers, use the checkbox option. Once you have selected checkbox you will notice that ‘Value’ fields appear and also a Default Value Choice.
Enter the ‘Values’ for your responses clicking ‘Add Value each time you wish to add another. Once you have input all responses you can choose a default value (if applicable).
If you wish to make this question compulsory, click the ‘Required’ checkbox.
To delete a value click on the red ‘x’ beside the value you wish to remove.
The red ‘x’ at the far right hand side deletes the whole question.
The ‘Add Record’ button adds a separate question.
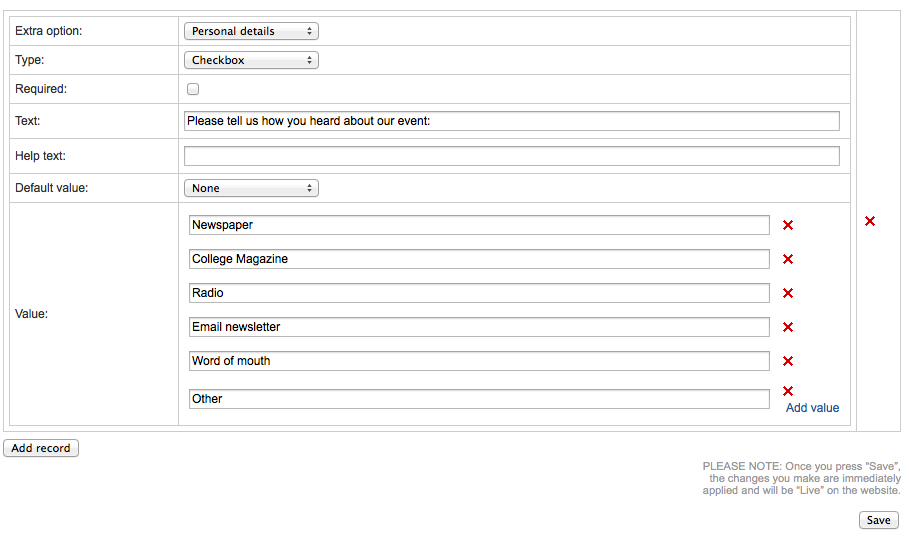

This is how your question will appear to customers entering your event:
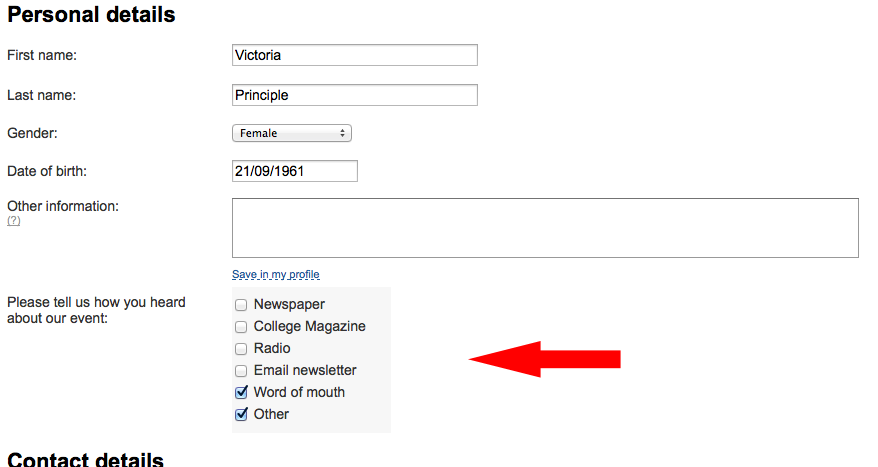

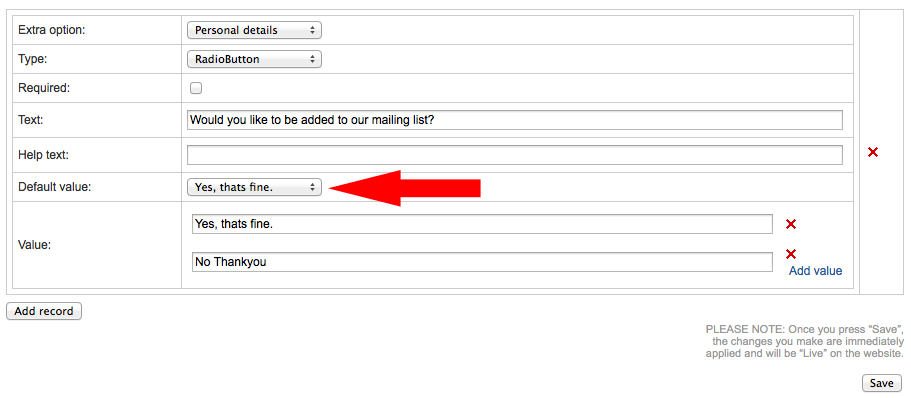
Types of pre-set responses - ‘Radio Button’
If you wish to present a number of pre-set answers, but wish the customer to select just one response you should use the ‘Radio Button’ option.
Notice in this example, the ‘Required’ checkbox has been selected which means that a response is required (ie this is a compulsory question).
There isn’t a default value selected on this example.
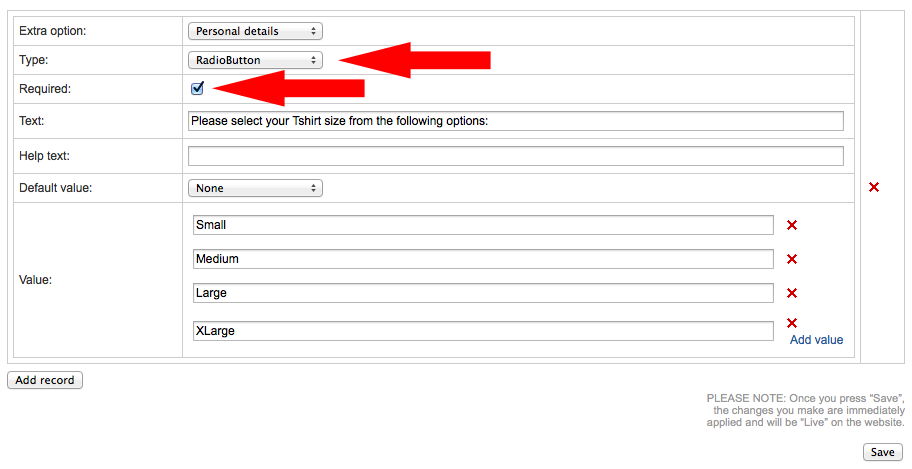

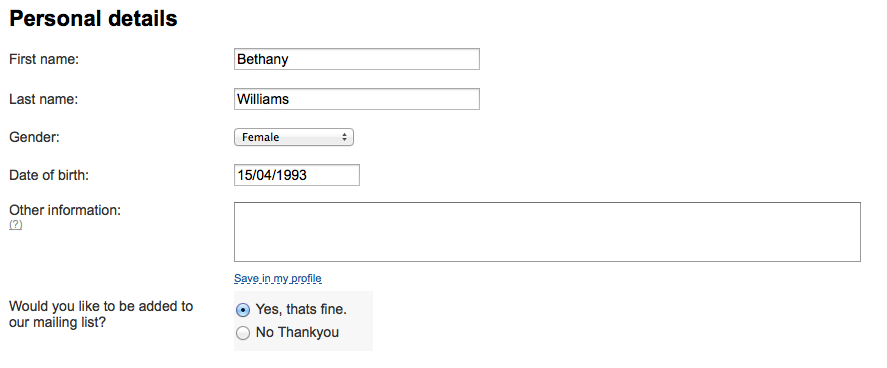
This is how your question will appear to customers entering your event:
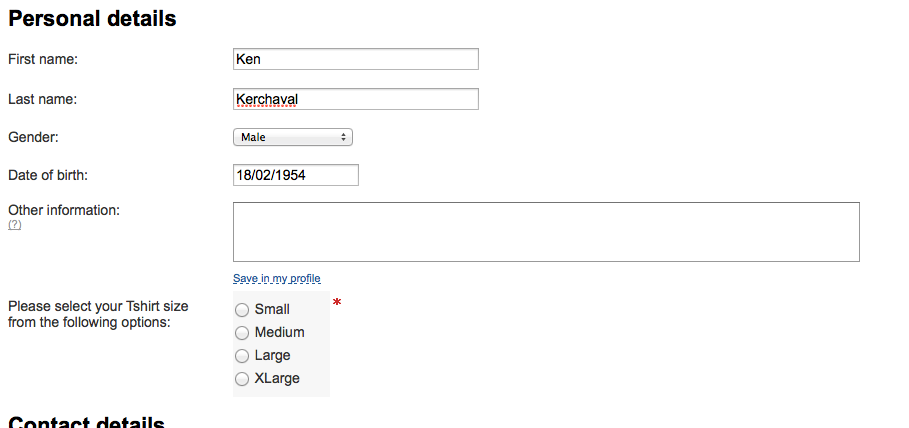

Notice that a red ‘*’ denotes that this is a compulsory question.
Default Value
Here is an example of when the ‘Default Value’ has been used. The question is presented to the entrant as before, but this time one of the pre-set responses has been chosen and will display as the default response.

And this is how the question appears on the entry form:

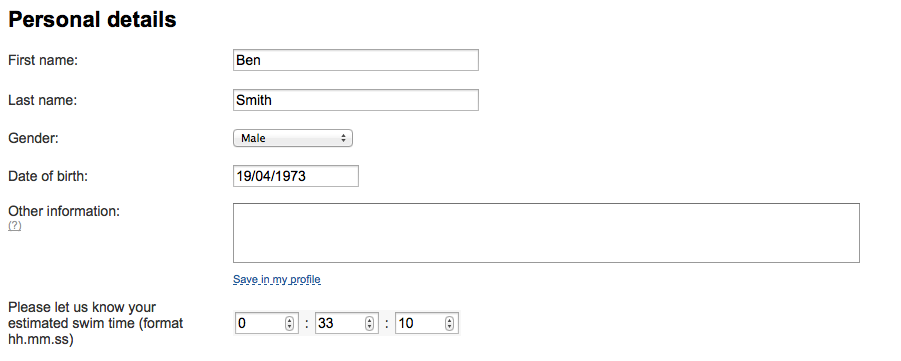
‘Time’
Occasionally you may wish to ask for a response that involves an estimated finishing time. To do this use the ‘Time’ option.


This is how the question will appear:

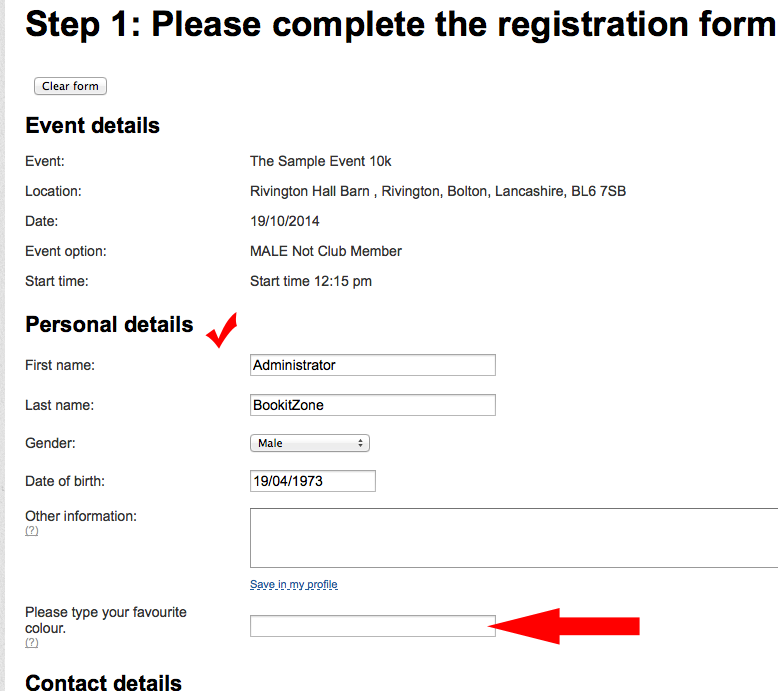
‘Single line Input’
This is the default option. Similar to the ‘Text’ option, you can use this when you require a free text response from the customer. You should use this if you expect the response to be a one word / short answer.
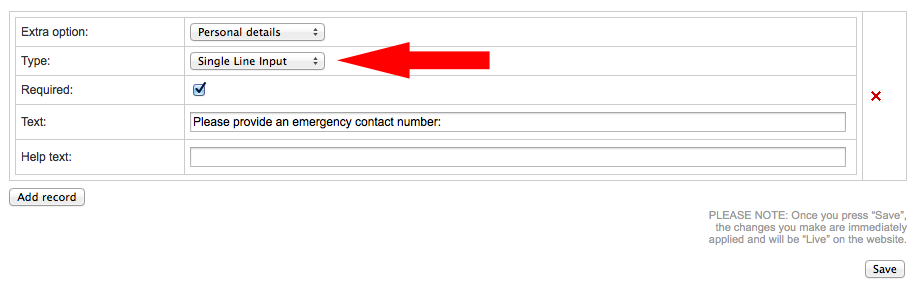

This is how the question will appear:

*** IMPORTANT: WHENEVER YOU HAVE MADE ANY CHANGE TO YOUR EVENT, PLEASE REMEMBER TO CLICK ‘SAVE’ OTHERWISE YOUR CHANGES WILL BE LOST ***
DISCOUNTS TAB


Items contained on the ‘Discounts’ tab:
Discounts
If you are offering any kind of discount or price offer you can add it here. Discount types might include an early bird discount or perhaps a ‘May Madness’ offer for example.
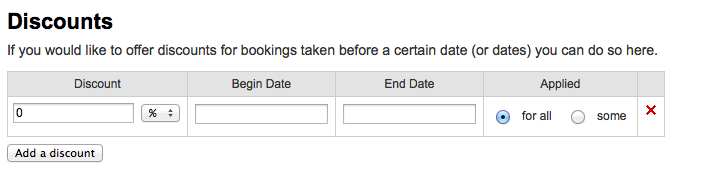

You can set the discounted rate (either as a percentage discount or a monetary discount, and set the (inclusive) date range when you wish the discount to apply. The discount is applied to the ‘Event Option’ prices found on the ‘Event Options’ tab.
You can also choose whether the discount should apply to all your event options or only selected options. This enables you to offer different discount rates to different options and makes the system very flexible.
Discount Examples
Example 1
Adding a £2 discount off the regular price across all ‘Event Options’ as an ‘Early Bird’ discount.


Example 2
Adding a 10% discount for the month of June, and a 5% discount for July. Note that outside of these periods, the full price will apply.
Add the first period of discount as before, choosing ‘%’ rather than ‘£’.
Now click the ‘Add a discount’ button.


Add in the second discount box, add your 5% discount for July.
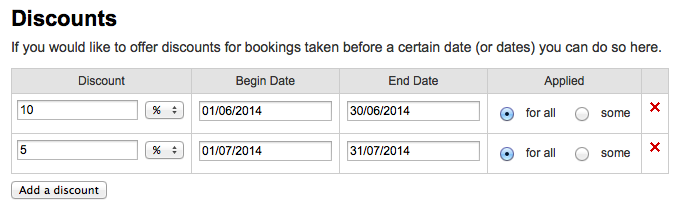

Click ‘Save’
Example 3
Applying a discount to only certain event options.
If you wish, you can choose which event options are to receive the specified discount.
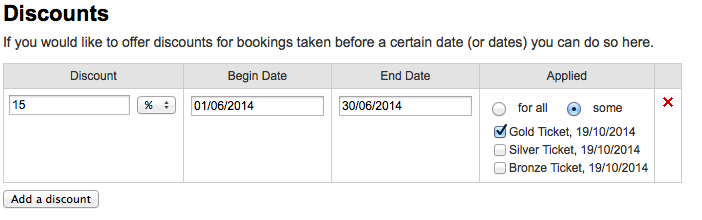

In this example, a 15% discount is applied to ONLY Gold Tickets during the month of June.
Promocode
If you wish to offer a free entry to your event for a sponsor or perhaps this has been offered as part of a complaint resolution, you can do so for any registered user of the website using the ‘Promocode’ section.


This promocode is unique and single use and is only available to be used by the user with the user account registered on BookitZone that you specify in the ‘User Email’ field.
*Note that the booking fee that would normally apply to his entry is deducted from the entry fees payable to the event organisers.
Example
In the example below, Alex Beetham was sent in the wrong direction by a marshall at last years running race which affected his finishing time. By way of an apology, you have offered him a free entry to this year’s event.
Alex is a registered user of the BookitZone website so type his email address in the ‘User email’ field. You will see that BookitZone generates a unique promocode which will become active as soon as you click the ‘Save’ button.
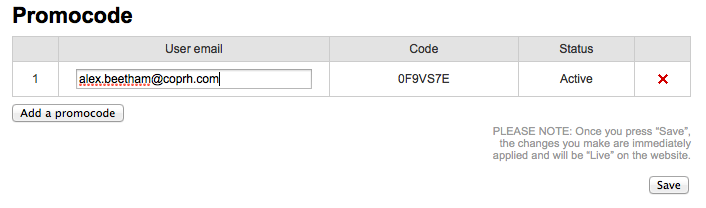

If you wish to generate additional promocodes for more users, simply click the ‘Add a promocode’ button.
Let your customer know his/her unique 100% discount promocode which he/she will be able to use via the website when entering your event.
*** IMPORTANT: WHENEVER YOU HAVE MADE ANY CHANGE TO YOUR EVENT, PLEASE REMEMBER TO CLICK ‘SAVE’ OTHERWISE YOUR CHANGES WILL BE LOST ***
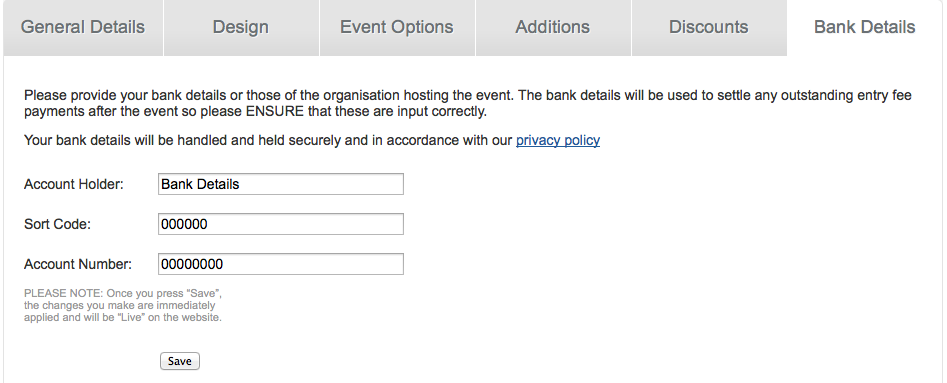
BANK DETAILS TAB


Should you wish to provide bank details for payment of your entry fees at this stage, you may do so here however you will be asked to confirm these before payment is made to ensure these are still valid and correct.
If you do not wish to provide bank details at this stage, please enter "Bank Details" and "00-00-00", "00000000" as shown below.

------------ End of Guide ------------
Customer
Q. I have registered with the website, but haven't received an email and can't sign in.
A. When you register with the BookitZone website, an email is sent to the email address you provide which contains a link that you need to click on to validate that you are the owner of that email address. Only once you have clicked this link and validated your account will you be able to sign in with the password you chose. If you do not receive this email as expected within 5 minutes, please first check your junk/spam email folder as 9/10 times the email will have been filtered in there in error by your email client / email provider (Hotmail, Yahoo and BTInternet are very good at doing this). If the email is not in the junk / spam folder and you haven't received it, its possible that you mis-typed the email address during the registration process. Please contact us for assistance.
Q. I'm trying to register but your system won't accept my postcode.
A. BookitZone uses a postcode verification database to ensure that addresses are consistent and accurate. Please take special care when entering postcodes which contain a '0' (Zero) or letter 'O' as an incorrectly formatted postcode will be rejected. (For example OL7 0BQ would be rejected if typed as OL7 OBQ).
If you reside in a newly built property (ie a new postcode area) or are still having problems, please contact us and we'll be happy to assist further.
Q. How do I know when online entries will close for an event?
A. BookitZone does not automatically display when online entries for an event are set to close though some Organisers may disclose this in the event description. Not displaying the online entry closure date is intentional as an Event Organiser can change the date the online entries close without notice and could close the event immediately - even if the original closure date is a number of weeks in advance. Our advice is to enter events early to avoid disappointment.
Q. I have never used BookitZone, yet the website says I am already registered. Why?
A. BookitZone is a rebranding of UKForms. If your details are already registered on BookitZone, you will have used UKForms.net in previous years.
Q. I only want to sign up for one event - why do I have to register with BookitZone to do this?
A. BookitZone acts as an agent on behalf of event organisers and provides an online entry service for events.
The details asked of you when you register on the website enable us to electronically submit an entry form on your behalf to the Event Organiser. Your details are stored securely and made available to the Event Organiser once you have made payment for an event. By using the website, you are in agreement with our privacy policy and the terms and conditions of the website which state that you are happy for BookitZone to store and use your data for the purposes of submitting your application to your chosen event. Your data is not used for any other purpose (sold to third parties) etc.
If you did not register on our website, we would be unable to share your information with the Event Organiser for the purposes of your entry to their event.
Organiser
Q. What do the items listed in the 'Actions' column do?
A. There are eight items that can appear in this column from time to time depending on the status of your event. The items are 'Preview', 'Edit', 'Clone', 'Make Live', 'Take Offline', 'Cancel Event', 'Delete Event' and 'Archive'. These are explained below:
- Preview - clicking on this will open up a preview of your event as your customers will see it 'live' on the website. Once you have finished, you will need to close the preview window which will have opened in either a new window or a new tab in your internet browser. Once closed, you will be back looking at your 'My Events' section.
- Edit - This is where you can go into the event details and make changes to them if/when required. Changes are applied instantly as soon as you click the 'Save' button.
- Clone - This is normally used to create a duplicate of an event that has past. You may use this to relist next years event. Cloning makes a duplicate of this event that you will only need to amend the dates of the event (assuming that everything else has remained the same). Cloning an event is designed to make listing subsequent events quicker and easier than starting to create an event from scratch.
- Make Live - Once you have created an event, and it has been approved by our moderators, it is still not yet visible on the BookitZone website. The timing of opening the online entries is in your hands. Clicking on 'Make Live' will immediately publish your event on BookitZone and open up online entries. As part of this process, we automatically tweet our twitter followers about the new event and also post the launch on our facebook page.
- Take Offline - When your event is 'live' on the website, you can stop entries and remove it from the website by clicking this 'Take Offline' link.
- Cancel Event - If you have had to make the decision to cancel the event, clicking on this link will start the event cancellation process.
- Delete Event - Just as it sounds - this will delete your event. Please use it wisely as it cannot be recovered. We recommend that you do not delete an event even after the day of the event has been and gone as you may wish to 'clone' the event next year (see 'clone' above)
- Archive - If you have several events listed on BookitZone, you can choose to 'Archive' past events so that they do not appear in your event view list. Archiving basically 'hides' the event from your view, but it is still available to be viewed later.
Q. I have had to cancel the event - what do I need to do and what are my responsibilities?
A. Sign in, navigate to your 'Dashboard', click on 'My Organised Events' and find the event from your events list that you wish to cancel. From the 'Actions'' column, click 'Cancel Event' and follow the event cancellation process.
Notifying those that have already entered your event that it has been cancelled is your responsibility as organiser of the event - BookitZone may be able to assist you with this however. When an event is cancelled you have two choices regarding the refunding of entry fees. BookitZone will either pay over to you the entry fees collected so far for you to process the refunds to the customers or, for a small charge, will initiate refunds on your behalf. Please see our terms & conditions regarding event cancellations (Section 6). Our current refund rate can be found here.
A. 9/10 times, this is caused by using an out of date web browser. BookitZone is designed to make full use of the very latest web browser capabilities to it is important that you are using a web browser that is the latest version. There are various web browsers available that you may be using such as Safari / Chrome / Firefox / Internet Explorer to name but a few. If upgrading to the latest version doesn't fix the problem for you, please contact us.
Q. I have created an event on BookitZone, but have heard nothing further.
A. To maintain quality standards and to ensure that no undesirable events are listed on BookitZone, all events need to be submitted for approval once they have been created. During the approval process, we may suggest or make improvements to the event entry form design. The approval process usually takes 24-48 hours unless submitted during holiday periods / weekends. If you do not hear anything from BookitZone, please ensure that you have actually submitted your event for approval (this is done on the final page during event creation). Until you submit your event we will not necessarily be aware of it.
A. If you did not supply a contact email address for enquiries, it is likely that customers would approach BookitZone for answers to any questions they may have. BookitZone is not in a position to answer queries for all events listed on the website and therefore you are required to provide an email contact address for this purpose.
A. Each event has a unique URL and also a unique QR code. You can find these by signing-in, then navigating to ‘My Organised Events’ on your ‘Dashboard’. Underneath the title of each event you have listed on BookitZone.com, you will see ‘Show Event Links’. Click this to see the URL and QR code for that event.
A. QR Codes are widely used by owners of smartphones and tablet computers. Using these devices and downloadable free apps, users can scan these QR codes. Some QR codes contain navigation instructions for sat-nav capable devices, some QR codes will link via the web to events on BookitZone. A QR code is printed on every booking confirmation which when scans provides a ‘Secret Code’ for future website development.
Q. How do I find the QR code that is unique to my event?
A. Each event has a unique URL and also a unique QR code. You can find these by signing-in, then navigating to ‘My Organised Events’ on your ‘Dashboard’. Underneath the title of each event you have listed on BookitZone.com, you will see ‘Show Event Links’. Click this to see the URL and QR code for that event.
Q. What is the difference between 'Pay-to-enter' and 'Free-to-enter' events?
A. A ‘Pay-to-enter’ event is where the event organiser charges an entrance fee to their event. An example of this would be a 10k Road Race. A ‘Free-to-enter’ event is one where it is free to attend the event but the Organiser wishes to pay for BookitZone to provide and manage the free entries to their event. An example of this may be a business conference that employees can attend for free.
Q. My event is full, how do I close it?
A. When an event is ‘Full’ you may wish to do one of two things. Firstly you may wish to close online entries completely and remove the event from the website, OR you may wish to mark the event as ‘Full’ but leave the event visible as some of those attending the event may wish to refer back to the event details.
To close the event and remove it from the website, sign-in, then navigate to ‘My Organised Events’ on your ‘Dashboard’. From the ‘Actions’ column adjacent to the event you wish to close, click ‘Take Offline’. You can re-instate the event at a later time if required by clicking on ‘Make Live’ – CLICK ‘SAVE’ TO SAVE YOUR CHANGES.
To mark the event as ‘Full’, sign-in, then navigate to ‘My Organised Events’ on your ‘Dashboard’. From the ‘Actions’ column adjacent to the event you wish to mark as Full’, click ‘Edit’. Click the third ‘Tab’ entitled ‘Event Options’. Edit and reduce the value in the ‘Maximum Entries/Tickets’ field to match the total number of entries received – CLICK ‘SAVE’ TO SAVE YOUR CHANGES.
Q. Can the website show the date that online entry will close?
A. There isn’t a particular field where this is shown, but if you wish to, you can add this information to the event description for all to see. To do this, sign-in, then navigate to ‘My Organised Events’ on your ‘Dashboard’. From the ‘Actions’ column adjacent to the event you wish to add the online entry closure date information to, click ‘Edit’. Click the second ‘Tab’ entitled ‘Design’. Edit the event description – CLICK ‘SAVE’ TO SAVE YOUR CHANGES.


